Fruit Tart
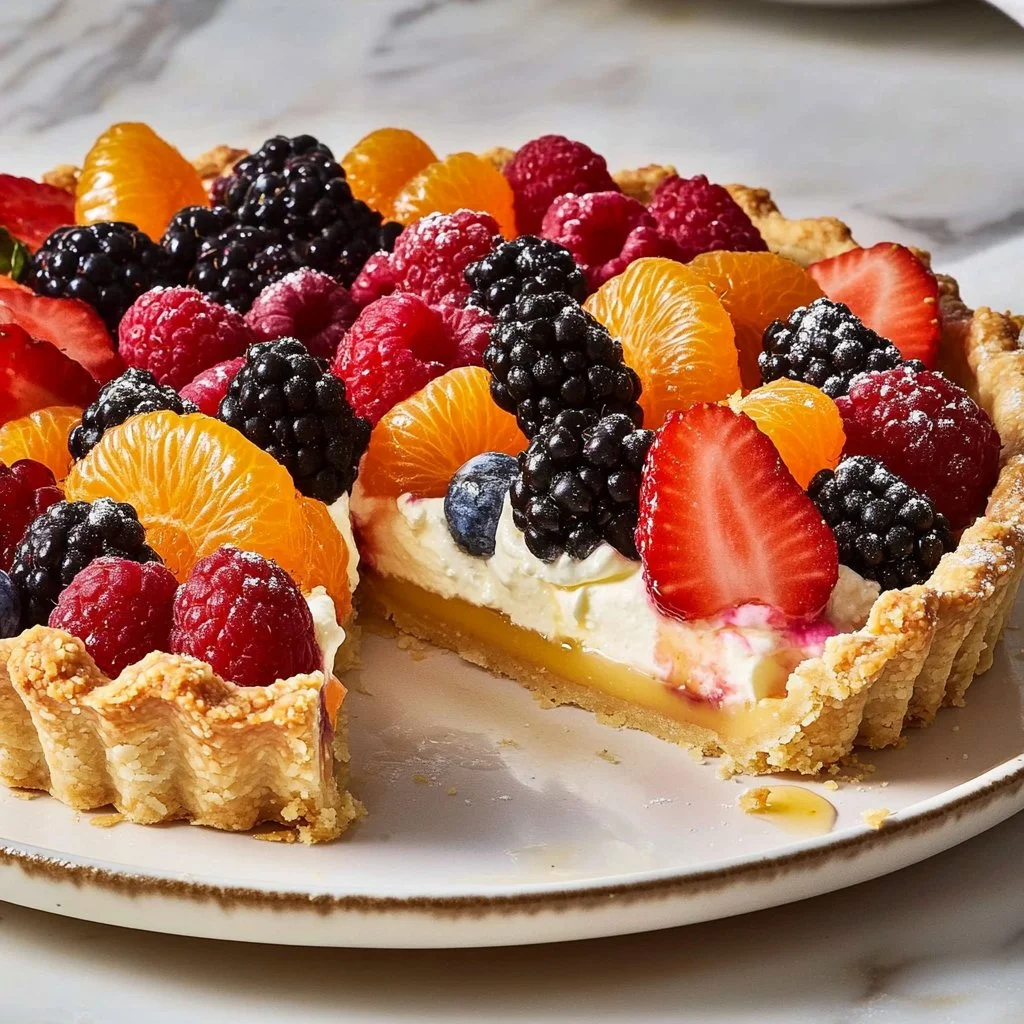
Savor the lusciousness of a classic Fruit Tart that beckons like a sweet summer breeze. Picture a golden crust, perfectly crisp yet tender, cradling a cloud of velvety mascarpone and cream cheese filling. Crowned with a jewel-toned array of fresh fruits, this dessert is a celebration of both taste and beauty. Whether you’re revisiting cherished childhood memories or creating new ones in the kitchen, this tart is irresistibly inviting. Its lightness and vibrant colors make it the ideal choice for warm afternoons, dinner parties, or simply satisfying that sweet tooth. With Fruit Tart, you can whip up a nostalgic delight that’s fast, kid-friendly, and oh-so-impressive.
Are You Ready to Indulge in Layers of Fresh Flavors?
What if I told you that your next dessert could bring back sweet memories? Have you ever shared a slice of tart with loved ones, laughter echoing through the kitchen? Imagine the moment you take that first bite—the harmonious blend of creamy and fruity, a burst of flavor that dances on your palate. Could this be the new addition to your go-to dessert repertoire? Let’s dive into a world of fruity goodness that’s waiting just for you!
Why You’ll Love This Recipe
Prepare to fall in love with a tart that checks all the boxes! Here’s why you’ll want to make this Fruit Tart over and over:
- Easy Prep: With minimal effort and fuss, you can create this stunning dessert.
- Crowd-Pleaser: Whether it’s a family gathering or a festive celebration, this tart is sure to impress.
- Fresh and Fruity: Bursting with seasonal fruits, it’s a gorgeous tribute to summer flavors.
- Versatile Options: Use any fruit you love! The choice is yours, making it customizable for every occasion.
Ingredients
Let’s gather the stars of this beautiful Fruit Tart. Each ingredient contributes to the symphony of flavors that come together in your dessert masterpiece:
- 1 1/3 cups all-purpose flour: A silky foundation for your crust.
- 1/4 cup granulated sugar: Tiny crystals that sweeten the dough and create a lovely flavor.
- 1/2 tsp kosher salt: A pinch of salt enhances sweetness, creating balance.
- 10 Tbsp butter, melted: The key to a rich and tender crust.
- 1/2 tsp almond extract: A whisper of nutty flavor that elevates the crust.
- 1/2 cup heavy cream: For luscious texture, this cream whips up beautifully.
- 1 (8 oz.) container mascarpone cheese: Rich and creamy, this is the heart of our filling.
- 4 oz. cream cheese, softened: Enhances the filling’s body and flavor.
- 1/2 cup powdered sugar: Adding sweetness without graininess.
- Juice of 1/2 lemon: Brightens flavors and balances sweetness perfectly.
- 1 cup sliced strawberries: Juicy and sweet, they add a splash of red.
- 1 cup blackberries: Tart and sweet in delightful contrast.
- 1 cup raspberries: Soft, velvety, and bursting with flavor.
- 2 mandarins: Segments that offer a refreshing citrus kiss.
- 1/3 cup blueberries: Just the right hint of sweetness.
- 1/4 cup apricot preserves: For that glossy finish on your tart.
Timing
This Fruit Tart is an exercise in delightful contrasts. While it may seem luxurious, it’s remarkably quick to prepare, perfect for those spontaneous get-togethers. From start to finish, you can have this tart ready in a couple of hours. The crust bakes in a snap, the filling comes together in moments, and before you know it, you’re chilling your masterpiece to perfection.
Step-by-Step
Step 1: Preheat your oven to 350 degrees. In a large bowl, whisk together the flour, sugar, and salt. This will give your crust a robust base. Then, add in your melted butter and almond extract, watching as the dough effortlessly comes together. Press this mixture into a 10-inch tart pan with a removable bottom, ensuring a smooth finish all the way up the sides.
Step 2: Take a fork and prick the crust all over—this is vital to prevent those pesky air bubbles. Bake until golden, approximately 20 to 25 minutes, and let cool completely.
Step 3: In a medium bowl using a hand mixer, beat the heavy cream until stiff peaks form, adding an airy touch to your tart. In a separate large bowl, mix together the mascarpone and cream cheese until creamy and smooth. Follow that with the powdered sugar, lemon juice, and almond extract until there are no lumps. Gently fold in the whipped cream, resulting in a fluffy, dreamy filling.
Step 4: Spread your luxurious filling generously over the cooled crust, then artfully arrange the fresh fruits atop, a vibrant feast for your eyes.
Step 5: In a small microwave-safe bowl, heat the apricot preserves with a splash of water for about 30 seconds until warm and glistening. Brush this syrup over the fruit, providing a delightful sheen. Chill your tart in the refrigerator for at least 2 hours, allowing the flavors to meld and the crust to be perfectly serene.
Nutritional Information
Indulging in a slice of Fruit Tart means embracing sweetness with delight. Each slice offers a balance of rich creaminess and fresh fruit notes, but remember—indulgence is part of the experience! While a typical slice can vary in calories depending on the fruits, expect around 300-400 calories per slice. Treat yourself occasionally; life is too short for anything less than heavenly desserts!
Healthier Alternatives
Looking to lighten things up a bit? You can easily swap out ingredients for healthier alternatives. Consider using a low-sugar pie crust or an almond flour base for your tart. Greek yogurt could also serve as a creamy substitute for the mascarpone and cream cheese mix, bringing added protein and reducing fat content. For a dairy-free option, cashew cream can achieve that lush texture everyone loves. Enjoy your delicious variations without sacrificing flavor!
Serving Suggestions
Your Fruit Tart is versatile enough to shine in many scenarios! Serve it after a lavish dinner, alongside a scoop of vanilla ice cream to elevate that creamy goodness. Perfect for summer holidays, birthday parties, or just a blissful weekend treat, it’s a dessert that can make any occasion feel extraordinary. Pair it with a sparkling fruit drink for an extra touch of festivity!
Common Mistakes
While crafting your Fruit Tart, watch out for common pitfalls. Overbaking the crust can lead to a dry texture, while underbaking may result in a soggy base. Be sure to let the tart cool completely before adding the filling; otherwise, the cream could melt and lose its dreaminess. Another key tip is to not overdo it with the fruit on top—simpler designs often yield better visual results and prevent a messy slice.
Storing Tips
If you find yourself with leftover Fruit Tart, fear not! You can store individual portions wrapped in plastic in the fridge for up to three days. For longer storage, consider freezing portions in airtight containers, where they can last for about a month. To reheat, simply let them sit at room temperature or place them in the fridge overnight. Enjoy the delightful flavors just as intended!
Tempting to Bake it ASAP!
With every slice of your beautiful Fruit Tart, you’ll awaken tasting memories filled with sweetness and nostalgia. It’s approachable yet impressive—just waiting to bring warmth into your home. So grab those vibrant fruits, dust off your baking pan, and let’s create a delicious dessert experience together! Treat yourself and your loved ones to something unforgettable—because every moment deserves a touch of sweetness.
FAQs
-
Can I use frozen fruit for the tart?
- Absolutely! Just ensure you thaw and drain excess liquid before adding them to the tart for best results.
-
What if I can’t find mascarpone cheese?
- You can substitute it with full-fat cream cheese or a mixture of cream cheese and sour cream.
-
Is there a gluten-free option for the crust?
- YES! Use almond flour or a gluten-free baking blend in place of all-purpose flour.
-
How can I get a shiny finish on my fruit?
- Heating apricot preserves with a bit of water and brushing it over the fruit gives a lovely glaze.
-
What’s the best way to slice the tart?
- Use a sharp, warm knife and clean it between slices for neat portions. Enjoy!