Peppermint Chocolate Layer Cake
Peppermint Chocolate Layer Cake is a decadent delight that combines the rich, comforting flavors of chocolate with the refreshing zing of peppermint. This cake is a stunning addition to any dessert table, making it perfect for holiday gatherings, birthdays, or just a special treat at home. The layers of moist devil’s food cake, slathered with creamy peppermint buttercream frosting and crowned with luscious chocolate ganache, create a sweet celebration in every bite. Whether you are an experienced baker or a novice in the kitchen, this recipe provides a simple step-by-step guide that will help you craft this beautiful cake with ease.
Why You’ll Love This Recipe
One of the standout benefits of the Peppermint Chocolate Layer Cake is its ease of preparation. Using a box mix for the cake provides a speedy option while still delivering a delicious outcome. The minimal ingredients needed mean less time shopping and more time enjoying the baking experience. This cake is also a crowd-pleaser; the unique combination of flavors appeals to both chocolate lovers and those who enjoy minty treats. Plus, its stunning appearance makes it perfect for special occasions, adding a touch of elegance to your festivities.
Ingredients
- 16-oz. box devil’s food cake mix – The star of our cake, this mix yields incredibly moist layers rich in chocolate flavor.
- Plus ingredients called for on box – Often eggs, water, and oil, which keep the cake tender and satisfyingly fluffy.
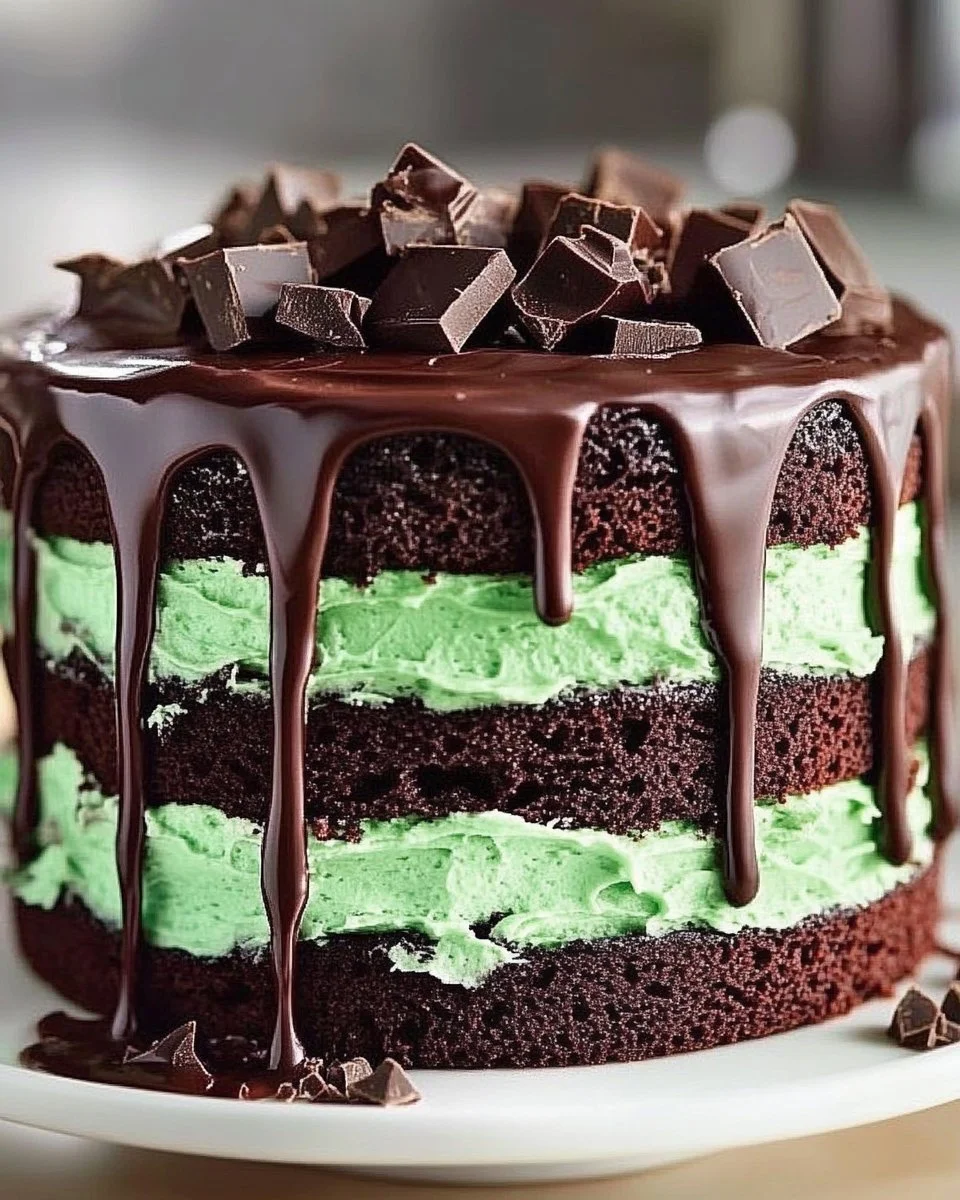
- 1 cup heavy cream – For crafting the luscious ganache that adds a silky texture and deep chocolatey richness.
- 2 cups chocolate chips – Semi-sweet or dark, offering that perfect melt-in-your-mouth texture for your ganache.
- 1 cup butter, softened – Brings creaminess and a rich, buttery flavor to the peppermint frosting.
- 5 cups (565 g.) confectioners’ sugar – For sweetness and the perfect texture in our buttercream frosting.
- 1 tsp peppermint extract – Infuses the frosting with that signature minty flavor that perfectly complements the chocolate.
- 3 Tbsp heavy cream – Adds extra creaminess to the frosting, making it smooth and spreadable.
- 6 drops green gel food coloring (optional) – For a festive touch that visually represents the peppermint flavor.
- Andes mints, for garnish – Provides a delightful finishing touch and extra minty flavor.
Step-by-Step Directions
-
Prepare the Oven: Arrange a rack in the center of your oven and preheat it to 350 degrees Fahrenheit. Grease three 9-inch round cake pans with cooking spray and line the bottoms with parchment paper for easy removal.
-
Make the Cake Batter: In a large mixing bowl, prepare the cake batter according to the package directions. Pour an even amount of batter into each prepared pan.
-
Bake the Cakes: Bake the cakes until a tester inserted in the center comes out clean, usually about 15 minutes. Once baked, transfer the cakes to a wire rack and allow them to cool completely.
-
Prepare the Ganache: Place chocolate chips into a medium heatproof bowl. In a small pot, over medium heat, warm 1 cup of heavy cream until tiny bubbles form around the edges. Remove from heat and pour the hot cream over the chocolate. Let it sit for 2 minutes before whisking until the mixture is melted and smooth. Allow it to cool at room temperature until it reaches a spreadable consistency, around 30 minutes.
-
Make the Buttercream: In a large mixing bowl, using a handheld mixer on medium-high speed, beat together the softened butter and peppermint extract until light and fluffy. Gradually add the confectioners’ sugar, 1 cup at a time, beating to incorporate after each addition. Mix in 3 tablespoons of heavy cream and green gel food coloring if using.
-
Assemble the Cake: Begin by arranging one cake layer on a serving platter. Spread one cup of buttercream frosting evenly over the top. Place a second cake layer on top and repeat with an additional cup of buttercream. Top with the third cake layer and cover the entire cake with more buttercream, smoothing the sides and top.
-
Add the Ganache: Pour the cooled ganache over the top of the cake. You can choose to frost the sides completely or let it drip down for an eye-catching effect. Finally, adorn the top of the cake with Andes mints for a decorative and flavorful garnish.
Tips & Tricks
- Baking Even Layers: To ensure your cake layers are even, weigh the batter for each pan before baking. This helps achieve uniform heights, making stacking easier.
- Sifting the Sugar: Sift the powdered sugar before using it in the buttercream to remove lumps for a smoother texture.
- Flavor Variations: Consider adding a touch of espresso powder to your cake batter for a mocha twist or different extracts like vanilla or chocolate for a unique flavor profile.
Serving Suggestions & Pairings
The Peppermint Chocolate Layer Cake is perfect for festive occasions. Serve it alongside hot cocoa or coffee for a comforting dessert pairing. It’s also delightful with a scoop of vanilla ice cream or a dollop of whipped cream on the side. For additional texture, serve with fresh berries or a berry compote that balances the richness of the cake.
Nutritional Information
Each slice of Peppermint Chocolate Layer Cake is a delightful indulgence, balancing taste and enjoyment. A typical slice contains approximately 400 calories, with a good dose of carbohydrates and fats, primarily from the sugar and butter. While enjoying desserts like this, remember to savor each bite and enjoy it as part of a balanced diet.
Storing Tips & Variations
To store your cake, keep it in an airtight container at room temperature for up to three days. If you want to extend its life, consider refrigerating it for up to a week. You can also freeze individual slices wrapped tightly in plastic wrap and foil for up to three months. If variations spark your interest, try substituting the devil’s food cake mix with a vanilla or red velvet flavor, or swap out the peppermint for other extracts like almond or orange for a different twist.
Conclusion
With its indulgent flavors and stunning presentation, the Peppermint Chocolate Layer Cake is a must-try dessert that promises to impress your family and friends. Whether you’re celebrating a special occasion or simply satisfying a sweet tooth, this recipe is concise and straightforward. We encourage you to give it a try, and don’t hesitate to share your experience; we’d love to hear how your creation turns out!
FAQs
-
Can I make the cake ahead of time?
Yes, you can bake the cake layers in advance and freeze them for up to three months. Just make sure to wrap them tightly to prevent freezer burn. -
What can I use instead of heavy cream in the ganache?
You can use coconut cream or a non-dairy milk (like almond milk) for a lighter option, though it may alter the ganache’s texture and richness. -
How can I make the frosting less sweet?
To balance the sweetness, you might consider reducing the amount of confectioners’ sugar and adding a pinch of salt or incorporating unsweetened cocoa powder to enhance the chocolate flavor. -
Is it okay to use a different size of cake pan?
Absolutely! Just keep in mind that baking times will change based on the size of the pans and the thickness of the layers. Always do a toothpick test to check for doneness. -
How do I ensure my cake doesn’t stick to the pans?
Greasing the pans and lining them with parchment paper helps prevent sticking. Be sure to let the cakes cool completely before removing them from the pans to ensure they maintain their shape.