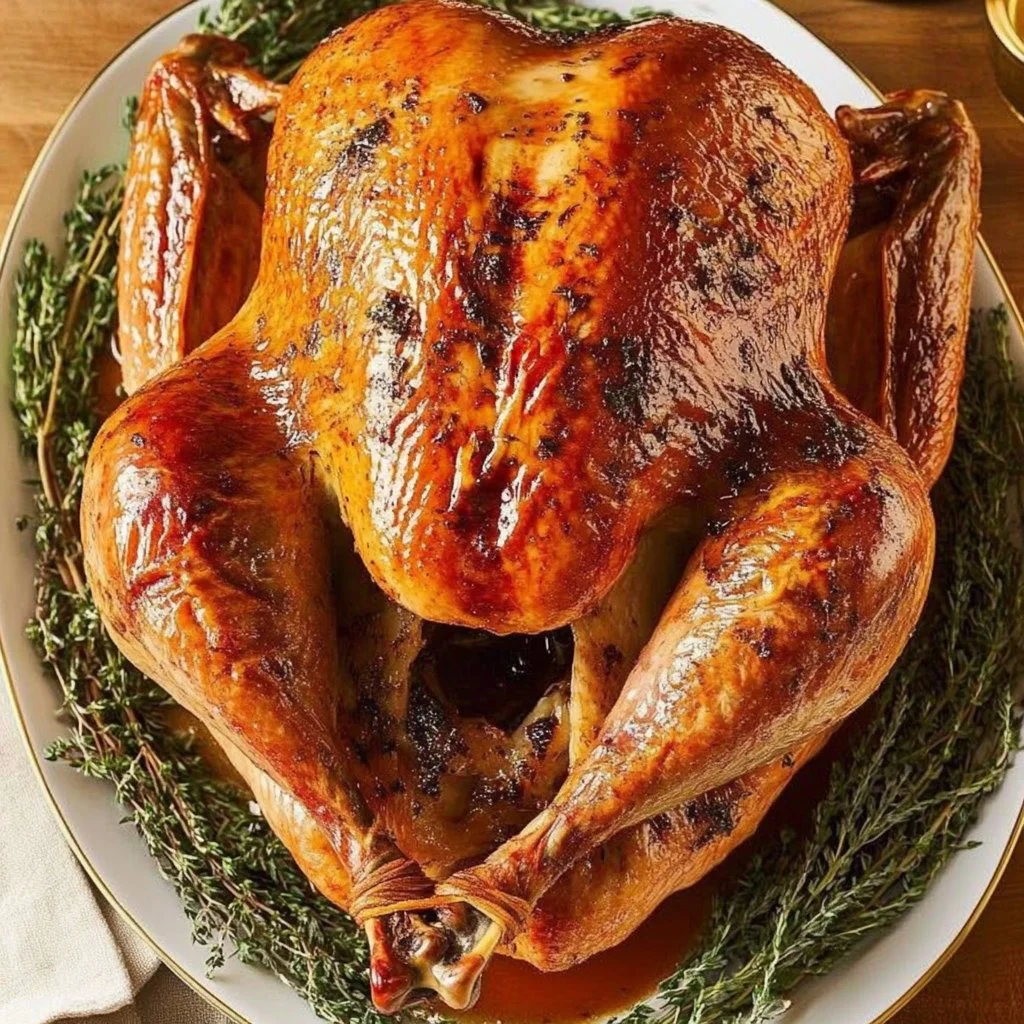
How to Dry Brine a Turkey
Brining a turkey might seem like a daunting task, but fear not, because dry brining is the secret to achieving that perfectly moist, flavorful bird that makes every holiday feast unforgettable. Imagine slicing into a beautifully roasted turkey with golden, crispy skin that crackles under your knife, releasing a cascade of savory juices that tantalize your taste buds. The aroma of garlic, fresh thyme, and warm butter waft through the kitchen, wrapping around you like a comforting embrace, pulling you back to those cherished family gatherings. This dry brined turkey recipe is not just about cooking; it’s about creating memories and sharing moments over a feast that everyone will talk about long after the last bite.
Are You Ready to Elevate Your Turkey Game?
Have you ever daydreamed about a turkey so succulent that your family throws around compliments like confetti? Imagine the delight on their faces as your oven transforms a humble turkey into a centerpiece worthy of applause. Don’t you want to impress your guests with your kitchen mastery? When your turkey takes center stage, it’s more than just a meal; it’s a testament to your culinary skills, your dedication to flavors, and your love for those gathered around the table.
Why You’ll Love This Recipe
This dry brine turkey recipe is a game-changer for several reasons:
-
Easy Prep: Minimal ingredients and straightforward steps make this recipe accessible to everyone, even if you’re just starting out in the kitchen.
-
Flavor Explosion: The dry brine infuses the turkey with moisture and flavor, preventing dryness and ensuring that each bite is a burst of savory goodness.
-
Crowd-Pleaser: There’s nothing like a perfectly roasted turkey to win the hearts of your family and friends—this recipe guarantees rave reviews.
-
Two Days in the Making: Prepare it a couple of days in advance, freeing up your time on the big day for other preparations or simply relaxing.
Ingredients
Gather these delightful ingredients to craft your mouthwatering dry brined turkey:
-
1 (8-lb.) whole turkey: The star of the show, just waiting to soak in that aromatic brine.
-
2 Tbsp. kosher salt: This essential ingredient enhances the meat’s natural flavors and locks in moisture.
-
1 Tbsp. granulated sugar: Adding a touch of sweetness balances the savory notes and helps achieve that lovely golden skin.
-
3 cloves garlic, finely chopped: Infusing the turkey with a zesty aromatic profile that makes your kitchen smell magical.
-
6 Tbsp. unsalted butter, melted: Creamy and rich, this butter ensures the turkey’s skin becomes beautifully crispy.
-
2 tsp. fresh thyme leaves: Earthy and fragrant, thyme intertwines its charming essence with the turkey.
-
Pinch of crushed red pepper flakes: Introducing a subtle heat that brightens the overall flavor.
-
Freshly ground black pepper: A sprinkle of black pepper adds a zing, enhancing the turkey’s taste.
Timing
Opting for dry brining allows for a fast and indulgent prep while ensuring your turkey benefits from a luxurious infusion of flavors. Over two days, not only does it soak up all those delicious seasonings, but it also makes your execution on the day-of much easier. With just a few hours in the oven, your turkey is positioned to become the culinary highlight of your celebration.
Step-by-Step
2 Days Before Cooking:
-
Remove giblets from the cavity of your turkey and pat the skin dry with paper towels, ensuring a crisp finish.
-
In a small bowl, mix together the kosher salt and granulated sugar.
-
Rub this divine salt mixture all over your turkey, taking extra care with the thicker parts of the meat, like the breast, like you’re preparing the turkey for a flavorful embrace.
-
Place the turkey in a large roasting pan, ensuring it’s cozy, and cover it loosely.
-
Refrigerate the turkey, uncovered, for 2 days. This will transform your turkey from average to extraordinary!
1 Hour Before Cooking:
- Drain any liquid that accumulates at the bottom of the pan. Then, pat the turkey dry again, letting it sit at room temperature for about an hour.
Time to Roast:
-
Preheat your oven to 425 degrees F as the excitement builds.
-
In a medium bowl, combine the finely chopped garlic, melted butter, fresh thyme leaves, crushed red pepper flakes, and a few grinds of black pepper. This mixture is the magic that will envelop your turkey in fragrant delight.
-
Brush about half of the garlic-butter mixture all over your turkey, making sure to cover every inch.
-
Tie the legs of your turkey together with kitchen twine, giving it a tidy, presentable shape.
-
Place the turkey on a roasting rack inside the roasting pan, ensuring canvassing around it is light and easy.
-
Roast the turkey, basting it with the remaining garlic-butter mixture halfway through. If the skin is browning too quickly, don’t hesitate to cover it with foil for the perfect roast.
-
After approximately 45 minutes, reduce the temperature to 375 degrees F and continue roasting. You know it’s done when the skin is a mesmerizing golden brown and an instant-read thermometer inserted into the thickest part of the breast reads 160 degrees F.
-
Let the turkey rest for about 15 minutes before slicing, allowing all those juices to redistribute for the ultimate tender bite.
Nutritional Information
This culinary masterpiece boasts approximately 350 calories per serving, depending on how generous you are with your portions. While the calories might seem indulgent, remember that good food nourishes both body and soul—truly a delightful balance between flavors and comfort.
Healthier Alternatives
If you’re looking to be mindful of your sugar and calorie intake while still offering the best flavors, consider these swaps:
-
Low-sugar: Replace granulated sugar with a sugar substitute suitable for baking, like Stevia or monk fruit.
-
Dairy-free: Swap unsalted butter with vegan butter or coconut oil for a plant-based twist while still achieving that rich flavor profile.
Serving Suggestions
Serve this stunning dry brined turkey alongside roasted seasonal vegetables, creamy mashed potatoes, or a power-packed grain salad. For the sweet-tooth in you, consider pairing it with your favorite ice cream or creating a post-dinner turkey sandwich drizzled with cranberry sauce. With indulgent sides, dessert options, or even elegant wines, this turkey will shine on any holiday table!
Common Mistakes
Avoid these pitfalls while preparing your dry brined turkey:
-
Overbaking: Keep a close eye on your oven to prevent that juicy turkey from turning into a dry disappointment.
-
Texture Issues: If brined improperly, the bird might become too salty or lack the tender texture you desire.
-
Messes: Brining can get a bit messy! Prepare your workspace first, and have paper towels on hand to keep things tidy.
Storing Tips
If you find yourself with leftover turkey—lucky you! Here’s how to store it:
-
Freezing Portions: Slice the turkey and pack it tightly in freezer-safe bags. Label it with the date for easy reallocation later!
-
Reheating Instructions: To bring back its moisture, gently reheat slices in a preheated oven at 325 degrees F, covered to retain heat and moisture.
Tempting Conclusion
Why wait? It’s time to transform your turkey game and create unforgettable memories with friends and family. It’s as much about the cooking as it is about savoring delicious food together, so grab your ingredients and start dry brining that turkey ASAP!
FAQs
1. Can I dry brine for less than 2 days?
While 2 days is ideal for optimal flavor, you can dry brine for at least 12 hours for a noticeable impact. However, don’t skimp on time if you can help it!
2. Can I use table salt instead of kosher salt?
Yes, but be cautious! Table salt is more potent than kosher salt. Use about half the amount to avoid a salt overload.
3. Is it necessary to let the turkey sit at room temperature before roasting?
Absolutely! This allows for even cooking and helps achieve that crispy skin we all crave.
4. Can I season the turkey other than with the dry brine?
Definitely, but remember the dry brine already packs in flavor. Keep additional seasonings light so as not to overpower the turkey’s natural taste.
5. How can I ensure my turkey stays moist even after baking?
Letting your turkey rest after roasting is vital to ensuring moisture retention. Avoid cutting into it immediately for the best results!