Candy Cane Cake
Candy Cane Cake is a delightful holiday dessert that brings together the festive flavors of peppermint and the joyous spirit of Christmas. Imagine a beautifully layered cake, adorned with swirls of luscious white and red frosting, and topped with crunchy peppermint candies. This cake is not just a treat for the taste buds but also a feast for the eyes! It’s easy to prepare and is sure to be a showstopper at any gathering, making it well worth the effort. With this step-by-step recipe, you’ll create a cake that will transport you back to the warmth of family festivities and create new memories every time you bake it.
Why You’ll Love This Recipe
This Candy Cane Cake is loved for several reasons. First and foremost, it features an easy preparation process that anyone can follow, making it a perfect baking project, even for beginners. The vibrant layers and the refreshing peppermint flavor await to impress your guests, whether at a holiday dinner or a casual get-together. The minimal ingredients make it accessible, yet the final presentation will have everyone thinking you spent hours in the kitchen. Moreover, it’s an ideal way to get kids involved in holiday baking, creating a fun family experience that is as enjoyable as the finished product.
Ingredients
- Cooking Spray: A light spray ensures that your cakes release perfectly from the pans without sticking.
- 5 Cups All-Purpose Flour: This forms the cake’s base, giving it that fluffy and soft texture.
- 3 Tsp. Baking Powder: The leavening agent that helps the cake rise beautifully.
- 1 1/2 Tsp. Kosher Salt: Balances the sweetness and enhances overall flavor.
- 3/4 Tsp. Baking Soda: Works alongside baking powder for optimal lifting.
- 3 Cups Granulated Sugar: Sweetness is key for our festive cake.
- 1 Cup Plus 2 Tbsp. Unsalted Butter, Softened: Adds rich creaminess and a luxurious mouthfeel to each slice.
- 7 Large Egg Whites: These create a light and airy structure.
- 1 Tbsp. Pure Vanilla Extract: Provides warmth and depth of flavor.
- 2 Cups Whole Milk: Contributes moisture, keeping the cake tender.
- Red Food Coloring: To create the vibrant, festive red layers.
- 4 Cups Unsalted Butter for Frosting: Essential for a rich, creamy frosting.
- 6 1/2 Cups Confectioners Sugar: To achieve the sweet, fluffy consistency desired in frostings.
- 3 Tsp. Peppermint Extract: Infuses that characteristic candy cane flavor.
- 2 Tbsp. Heavy Cream: Helps to soften the frosting for easy spreading.
- Pinch of Kosher Salt: Enhances flavors in the frosting.
- Peppermint Candies, for Decorating: A festive touch for the final decoration.
Step-by-Step Directions
Step 1: Preparing the Cakes
Begin by arranging a rack in the center of your oven and preheating it to 350 degrees Fahrenheit. Take four 8-inch round cake pans and grease them with cooking spray, ensuring an even release post-bake. Line the bases with parchment paper for extra security. Next, in a large bowl, whisk together 5 cups of all-purpose flour, 3 teaspoons of baking powder, 1 1/2 teaspoons of kosher salt, and 3/4 teaspoon of baking soda. This dry mixture sets the foundation for your delicious cake layers.
Step 2: Mixing the Batter
In the bowl of a stand mixer fitted with the whisk attachment, combine 3 cups of granulated sugar and 1 cup plus 2 tablespoons of softened unsalted butter. Beat on medium-high speed until light and fluffy, which should take about 2 to 3 minutes. Once fluffy, add 7 large egg whites and 1 tablespoon of pure vanilla extract, mixing until well combined. Gradually pour in 2 cups of whole milk and reduce the mixer speed to medium-low. Finally, add the dry ingredients and beat until just combined, taking care not to overmix.
Step 3: Adding Color
Carefully transfer half of the batter to a large bowl. Add 1 drop of red food coloring and stir. Increase the food coloring until you’ve reached a shade you desire. Next, divide the white batter equally among two prepared pans and do the same with the red batter in the remaining two pans.
Step 4: Baking
Place the pans in the preheated oven and bake the cakes for about 25 minutes, or until a toothpick inserted into the center comes out clean. After baking, let them cool for about 15 minutes before inverting them onto wire racks. Allow the cakes to cool completely, as this step is crucial for a smooth frosting application later on.
Frosting Step 1: Preparing the Frosting
In the bowl of your stand mixer fitted with the whisk attachment, beat 4 cups of unsalted butter on medium-high speed for about 2 minutes, until it is light and fluffy. Gradually add 6 1/2 cups of confectioners’ sugar, 2 tablespoons of heavy cream, 3 teaspoons of peppermint extract, and a pinch of salt. Beat the ingredients together until well incorporated, resulting in a fluffy frosting that is perfect for layering.
Frosting Step 2: Coloring the Frosting
Now, take 1 1/2 cups of this frosting and transfer it to another bowl. Add one drop of red food coloring and stir until you achieve the desired hue. This will be used for piping decoration later.
Frosting Step 3: Layering the Cakes
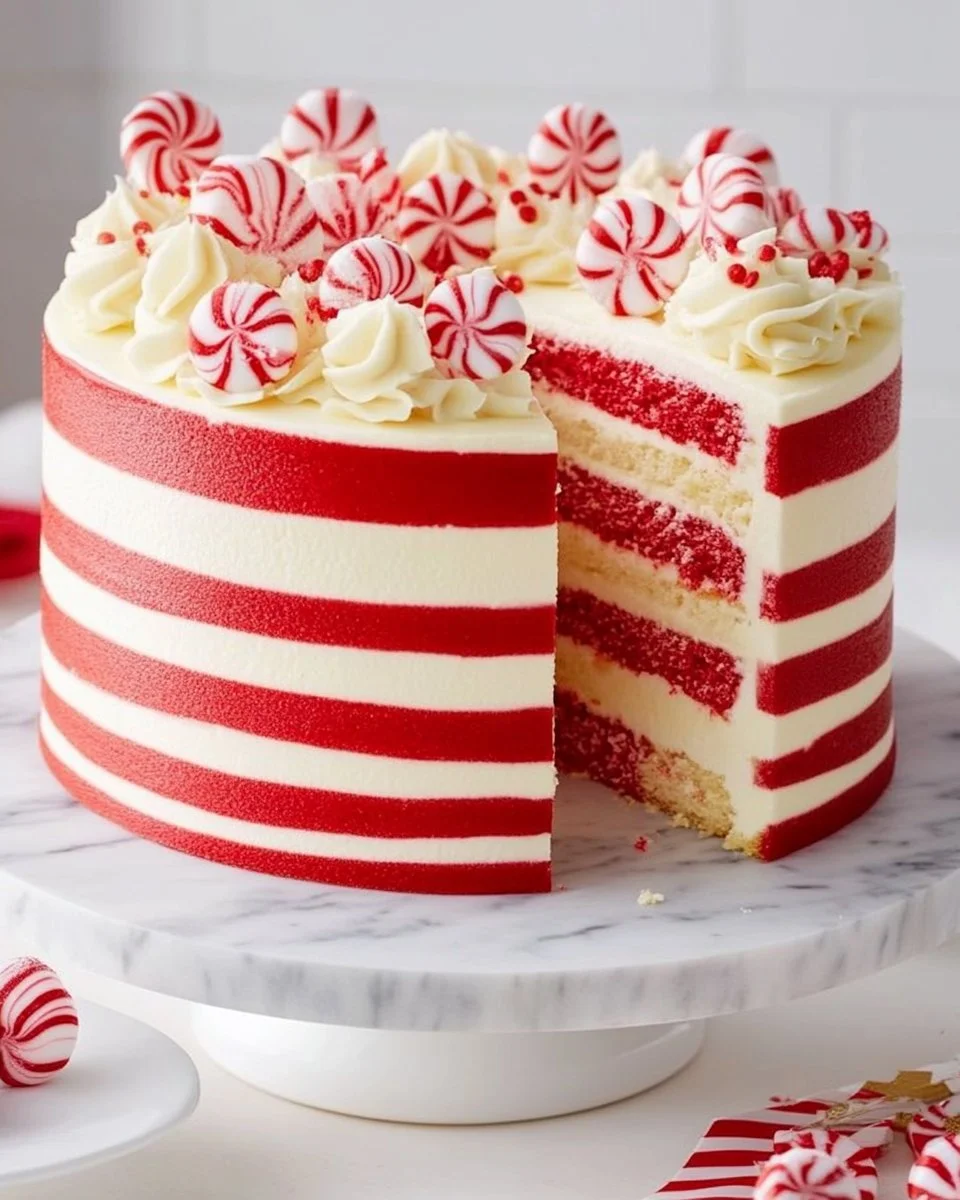
Slice each cake layer in half horizontally to create a total of four white and four red layers. Start your cake assembly on a serving platter by placing one white layer down first. Spread 3/4 cup of the white frosting on top of this layer, then add a red layer on top and repeat the frosting process. Continue this until all layers are stacked, alternating the colors. For the top, apply 1 1/2 cups of white frosting to create a crumb coat, sealing any loose crumbs. Refrigerate for about 30 minutes until set.
Frosting Step 4: Final Touches
Take the remaining red and white frosting and transfer each color into separate piping bags. Pipe beautiful red and white stripes around the sides of the cake and smooth them out using a tall bench scraper for a polished finish. Finally, top with crushed peppermint candies to add a delightful crunch and sweetness.
Tips & Tricks
For an even fluffier cake, ensure that your ingredients are at room temperature before mixing. Always level your cake layers after baking for a professional look. If you want to make the preparation simpler, use store-bought frosting instead of making your own. Additionally, using a serrated knife helps separate the layers evenly and with minimal crumbling.
Serving Suggestions & Pairings
The Candy Cane Cake is perfect for holiday celebrations, birthday parties, or any festive occasion. Pair it with a warm cup of hot cocoa or a steaming latte for the ultimate winter treat. It also pairs wonderfully with vanilla ice cream, adding a creamy contrast to the peppermint flavor. Consider serving it on a sparkling platter adorned with fresh evergreen for an elegant presentation.
Nutritional Information
Each slice of Candy Cane Cake contains approximately 500 calories, with essential nutrients like carbohydrates from the cake and some fat from the butter. Enjoy this cake in moderation, as it is a treat that should be savored. Remember to balance it with healthy meals throughout the day, keeping festivities enjoyable without overindulgence.
Storing Tips & Variations
For storing, keep the cake in an airtight container in the refrigerator. It will last for about 3-4 days, though it is best enjoyed fresh. You can freeze layers wrapped tightly in plastic wrap for up to a month; just be sure to frost after thawing for the best texture. Variations on this recipe can include adding different colors, flavors, or filling options; consider adding chocolate ganache between layers or a cream cheese filling for a twist on the classic recipe.
Conclusion
Candy Cane Cake is not just a dessert; it’s a celebration of the festive season, packed with flavor and whimsy. We invite you to try this delightful recipe and share your joyous experience with family and friends. Whether enjoyed at a holiday party or a cozy family gathering, this cake promises to bring smiles and sweet memories.
FAQs
1. Can I make this cake ahead of time?
Yes, the cake layers can be baked and stored in the freezer for up to a month. Frost the cake once it’s fully thawed for best results.
2. Can I substitute any ingredients?
Yes, you can use dairy-free butter and milk if you prefer a dairy-free option. Keep in mind that flavor and texture might slightly vary.
3. How can I adjust the sweetness of the frosting?
To reduce the sweetness, consider using less confectioners’ sugar or incorporating a cream cheese frosting that balances well with the sweetness of the cake.
4. Can I use a different extract apart from peppermint?
Absolutely. Almond or vanilla are excellent alternatives for a different flavor profile. Just be mindful that it will alter the seasonal taste.
5. How do I decorate the cake for a more festive look?
You can add edible glitter, festive sprinkles, or fresh mint leaves. Get creative with your décor to match your seasonal celebration!