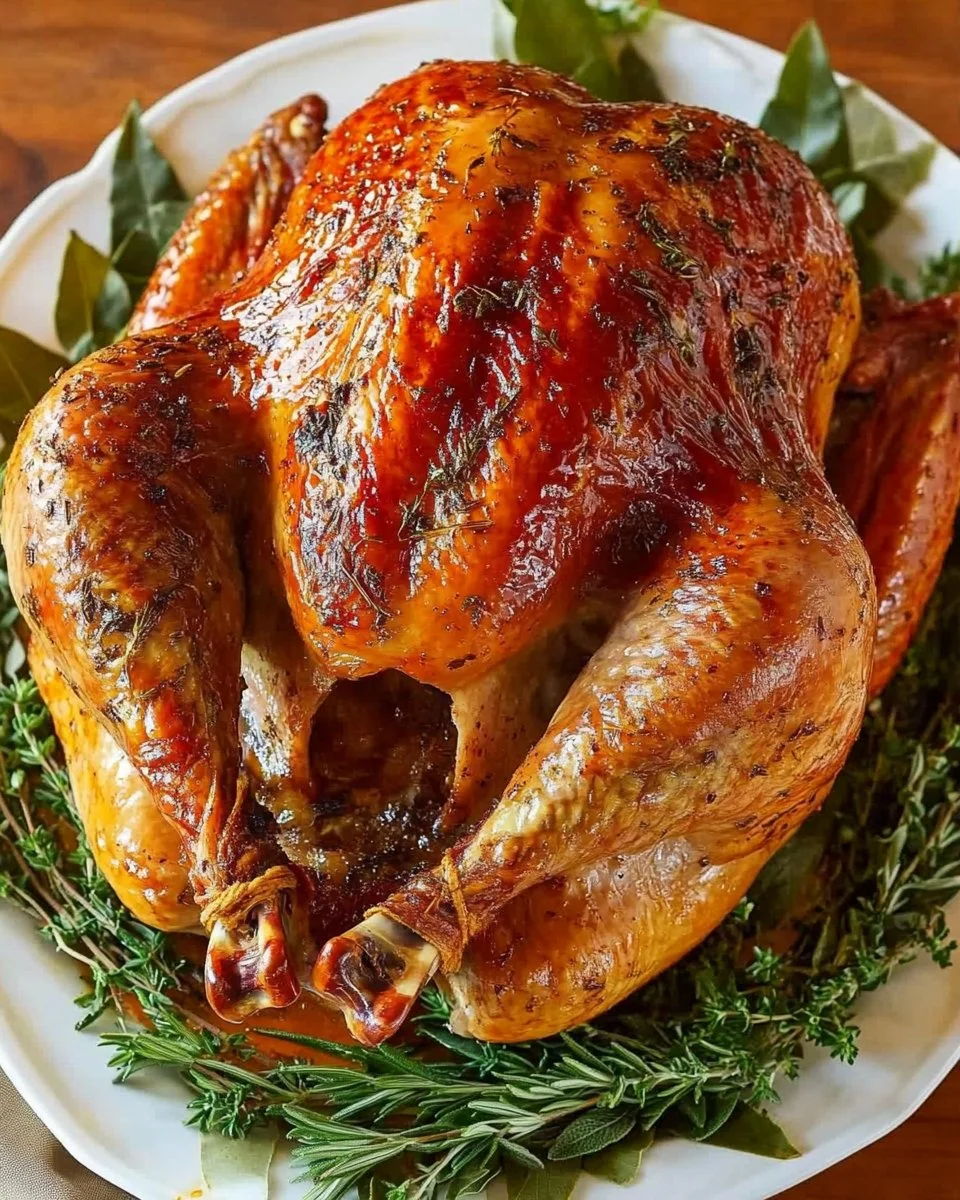
How To Dry Brine A Turkey
How to dry brine a turkey is a straightforward yet transformative method that elevates the classic Thanksgiving centerpiece to a whole new level of flavor and juiciness. Imagine a beautifully golden-brown turkey gracing your table, its skin crispy and crackling, while the meat inside remains succulent and tender. Dry brining is worth making for any family gathering or festive feast, as it enhances the natural flavors of the turkey while ensuring that each bite is gratifying and comforting. This step-by-step recipe is easy to follow and guarantees a show-stopping dish.
Why You’ll Love This Recipe
This dry-brined turkey recipe is not only a crowd-pleaser but also requires minimal ingredients and prep time. By simply rubbing a blend of kosher salt and granulated sugar on the turkey, you begin the process of infusing flavor and moisture that will impress your family and friends. The addition of aromatic garlic, fragrant thyme, and a hint of heat from red pepper flakes ensures your turkey isn’t just delicious, but memorable. Plus, it’s a cooking method that allows you to prepare the turkey ahead of time, freeing you up for other culinary delights or family bonding moments as the big day approaches.
Ingredients
- 1 (8-lb.) whole turkey: The star of the show, chosen for its robust flavor and tender meat.
- 2 Tbsp. kosher salt: Coarse and flavorful, this essential ingredient pulls moisture from the turkey and locks it back in, making for a juicier bird.
- 1 Tbsp. granulated sugar: It balances the saltiness and enhances the caramelization of the skin.
- 3 cloves garlic, finely chopped: Adding a fragrant, savory punch, these little gems will flavor the melted butter and infuse the turkey.
- 6 Tbsp. unsalted butter, melted: Rich and creamy, it will help create a golden-brown crust.
- 2 tsp. fresh thyme leaves: Earthy and aromatic, thyme complements the savory elements beautifully.
- Pinch of crushed red pepper flakes: For a gentle warmth that awakens the palate without overpowering the turkey’s flavor.
- Freshly ground black pepper: A finishing touch that enhances all the other flavors.
Step-by-Step Directions
Two days before cooking: Start your dry brining journey by removing the giblets from the cavity of your turkey. With some paper towels, pat the turkey dry, ensuring it’s fully moisture-free. In a small bowl, combine the kosher salt and granulated sugar. This mixture is the cornerstone of your dry brine.
Rub it all over: Generously rub the salt mixture all over the turkey, focusing especially on the thicker parts of the meat, like the breast, to ensure optimal flavor penetration. Once satisfied, place the turkey in a large roasting pan, leaving it uncovered and refrigerating for two days. This is where the magic of dry brining occurs!
One hour before roasting: When you’re ready to cook, drain any liquid that has accumulated at the bottom of the pan. Pat the turkey dry once more with paper towels, letting it rest at room temperature for one hour; this helps achieve an even cook and a crispy skin.
Prepping for roasting: Preheat your oven to 425 degrees Fahrenheit. In a medium bowl, mix together the chopped garlic, melted butter, fresh thyme leaves, crushed red pepper, and a few grinds of black pepper to create a fragrant basting mixture.
Brush and tie: Brush about half of the garlic-butter mixture generously over the turkey, ensuring it’s well coated. Tie the legs of the turkey together with kitchen twine to make for a tidy presentation and even cooking.
Roasting time: Place the turkey on a roasting rack inside the roasting pan. Roast for 45 minutes, basting with the remaining garlic mixture halfway through. If you notice the turkey skin browning too quickly, cover it with foil to prevent burning.
Lower the heat: After 45 minutes at the high heat, reduce your oven temperature to 375 degrees. Continue roasting until the skin is a glorious golden brown, and an instant-read thermometer inserted into the thickest part of the breast reads 160 degrees – this should take about 45 more minutes.
Final touches: Once cooked, let the turkey rest for 15 minutes before slicing. This final step allows the juices to redistribute, ensuring each slice is as juicy and tender as possible.
Tips & Tricks
For the best results, consider these extra tips:
- Plan Ahead: Ensure you start the brining process two days prior to when you wish to serve the turkey.
- Use Fresh Ingredients: Whenever possible, opt for fresh herbs and high-quality butter for richer flavors.
- Tweak to Your Taste: Feel free to adjust the amount of garlic and thyme based on your family’s tastes.
- Consider Using Aromatics: Add citrus fruits or onions in the cavity of the turkey for an extra layer of flavor while it roasts.
Serving Suggestions & Pairings
This dry brined turkey pairs beautifully with classic side dishes like creamy mashed potatoes, savory stuffing, and roasted seasonal vegetables. Consider adding a cranberry sauce for a tart contrast and a green salad to introduce freshness to your meal. Perfect for Thanksgiving, Christmas, or any festive gatherings, this turkey recipe will surely become a family tradition.
Nutritional Information
A typical serving of dry brined turkey (about 4 ounces) contains approximately 200 calories, with high protein content and healthy fats from the butter. It’s essential to balance this dish with fiber-rich sides and plenty of vegetables to round out your meal.
Storing Tips & Variations
Should you find yourself with leftovers, they can be stored in an airtight container in the refrigerator for up to four days. For longer-lasting turkey, consider freezing it. Wrap the slices tightly in plastic wrap or aluminum foil before placing them in a freezer bag. When reheating, ensure it reaches a safe internal temperature of 165 degrees Fahrenheit for optimum safety.
For variations, you could try adding different herbs for a unique twist, like rosemary or sage. You can even experiment with spices like paprika or cumin in the rub for a distinctive flavor profile.
Conclusion
Now that you know how to dry brine a turkey, it’s time to give it a try! This straightforward and effective method will elevate your turkey game and leave everyone at your table raving about the incredible flavors and moistness of the meat. We can’t wait to hear how your turkey turns out—share your experiences and any tips you discover along the way!
FAQs
1. How long should I dry brine my turkey?
For optimal results, a two-day brining process is recommended. This allows enough time for the salt to penetrate and lock in moisture.
2. Can I dry brine a frozen turkey?
Yes, but be sure to thaw it completely before beginning the dry brine process. Thawing in the refrigerator is the safest method.
3. What if I can’t find kosher salt?
If you can’t find kosher salt, you can use sea salt instead. However, be cautious with the amount since sea salt is finer and can result in a saltier brine.
4. Can I use spices other than what’s listed?
Absolutely! Feel free to get creative and add your own favorite spices or herbs to customize the flavor to your liking.
5. What do I do if my turkey skin starts to brown too quickly in the oven?
If you notice the skin is browning too quickly, simply cover the turkey loosely with aluminum foil to prevent further browning while allowing the inside to thoroughly cook.
This guide provides everything you need to create a stunning dry brined turkey that will be the centerpiece of your holiday meal. Enjoy the process, and happy cooking!